Tongue_and_groove is a classic joint system that has stood the test of time. Whether you’re renovating a cabin or updating your modern home, tongue and groove offers a secure and polished solution. In fact, the tongue_and_groove method involves one board with a protruding “tongue” and another with a recessed “groove” that fits together perfectly.
Because of its simplicity and effectiveness, tongue and groove has been used for centuries in everything from walls to ceilings and even floors. It’s no wonder that this method remains a favorite in woodworking, architecture, and DIY circles.
How Does Tongue and Groove Work?

At its core, the tongue_and_groove joint is all about fit. One board features a ridge (the “tongue”), while the adjacent board features a slot (the “groove”). When you push them together, they lock tightly. This connection reduces gaps, boosts structural integrity, and looks great.
Moreover, many builders prefer this technique because it reduces warping, especially in wood prone to movement due to humidity. Therefore, you’ll often find tongue_and_groove in ceilings, flooring, siding, and paneling.
Types of Tongue and Groove Applications
Let’s break down some of the most popular ways people use tongue_and_groove boards in real-life home improvement.
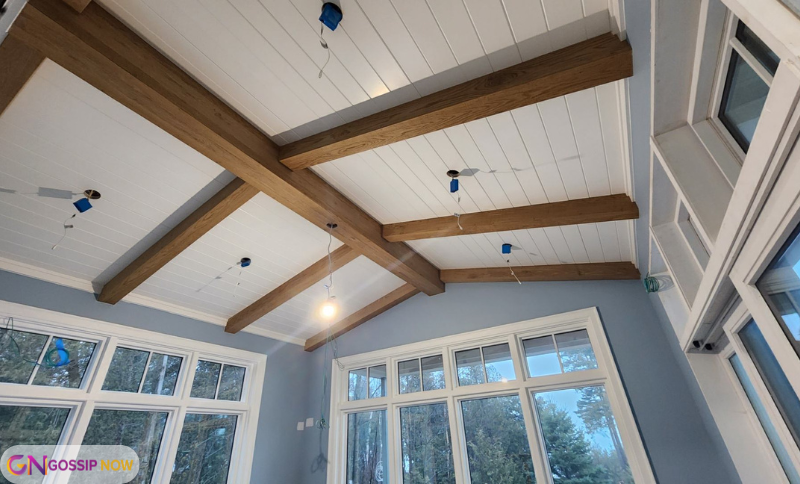
1. Tongue and Groove Ceiling
One of the most stylish uses is the tongue and groove ceiling. Whether you want a rustic cabin vibe or a clean farmhouse look, this style adds texture and warmth to any space.
-
Perfect for vaulted or flat ceilings
-
Often made from pine, cedar, or painted MDF
-
Easy to install with finishing nails and adhesive
Many homeowners choose pine tongue_and_groove ceiling options because pine is affordable and lightweight, making it ideal for overhead projects.
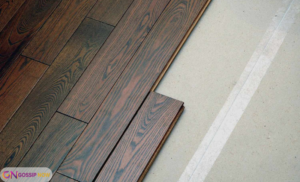
2. Tongue and Groove Flooring
Another common use is tongue_and_groove flooring. Wood flooring must be tight, stable, and uniform — all qualities this system provides.
-
Used in both solid and engineered hardwood
-
Provides tight seams for smoother surfaces
-
Reduces creaking and shifting over time
Because floors endure heavy foot traffic, the durability of tongue_and_groove joints keeps boards from lifting or creating gaps.
3. Tongue and Groove Siding
Exterior applications are also popular. In this case, tongue_and_groove siding is installed vertically or horizontally depending on design preference.
-
Creates a weatherproof seal
-
Enhances curb appeal
-
Works well with cabins, barns, and sheds
Additionally, the interlocking design offers extra insulation and prevents wind or rain from penetrating.
4. Tongue and Groove Boards for Walls
In interior design, tongue_and_groove boards work beautifully as wall paneling.
-
Ideal for accent walls
-
Easy to stain or paint
-
Adds a craftsman-style finish
This look suits modern farmhouse aesthetics as well as coastal or traditional interiors.
Tongue and Groove Materials
Different wood species and materials offer unique advantages. Here’s a quick comparison:
| Material | Use | Why Choose It? |
|---|---|---|
| Pine | Ceilings, walls | Lightweight, easy to install |
| Cedar | Siding | Weather-resistant, aromatic |
| Oak/Maple | Flooring | Hardwearing, long-lasting |
| MDF (Medium-Density Fiberboard) | Painted interiors | Affordable, smooth surface |
| Plywood | Subfloors or backing | Durable and budget-friendly |
Furthermore, tongue and groove plywood is often used for subflooring due to its strength and ease of installation.
Tools Used for Tongue and Groove
To install or even create your own tongue_and_groove joints, you’ll need the right tools. Here’s what professionals and DIYers often use:
1. Tongue_and_Groove Router Bits
-
Great for making custom joints
-
Ideal for precision work on hardwood
2. Tongue_and_Groove Pliers
-
Common in plumbing, but also used in wood joinery for adjusting tight joints
-
Helps in installation without damaging the boards
These tools ensure a clean, snug fit and can help even beginners achieve professional-level results.
Installation Tips and Tricks
If you’re ready to try a tongue_and _groove project, here are a few pro tips to get you started:
-
Acclimate your wood: Let boards sit in the room for a few days to adjust to temperature and humidity.
-
Use spacers: Especially for flooring, a small gap around the perimeter helps with natural expansion.
-
Nail at an angle: Nailing through the tongue helps hide fasteners and improves strength.
-
Paint or stain before installing: This avoids visible gaps or missed spots after boards are up.
Why Choose Tongue and Groove Over Other Methods?
While there are many ways to join boards, tongue_and_groove stands out because:
-
It provides a seamless, smooth appearance.
-
It minimizes gaps and movement.
-
It’s easier to install than many people think.
-
It works across ceilings, walls, floors, and exteriors.
Thanks to these benefits, tongue_and_groove remains a go-to solution for both professionals and weekend DIY warriors.
Common Problems and How to Avoid Them
 Even the best methods can go wrong without care. Here are some common tongue_and_groove challenges and how to fix them:
-
Boards don’t fit together? Check for swelling due to humidity or warped pieces. Sand lightly or let dry.
-
Cracking sounds when walked on? Make sure the subfloor is flat and the boards are properly acclimated.
-
Visible seams or gaps? Always start from a straight wall and work outward. Keep boards tight as you go.
Real-Life Uses of Tongue and Groove
From cozy cabins in the mountains to chic urban lofts, tongue_and_groove design is everywhere. Some of the most stylish Instagram-worthy homes incorporate tongue_and_groove ceilings, pine accent walls, or even entire living rooms decked out in wood paneling.
In fact, designers often recommend it for its warmth and timeless charm. So, if you want a space that feels grounded, textured, and authentic, tongue _and_groove should be high on your list.
Bio Table
| Name | Kevin Monroe |
|---|---|
| Profession | Woodworking & Home Renovation Writer |
| Expertise | Carpentry, DIY, Flooring, Interiors |
| Experience | 10+ Years in Construction & Design |
| Location | Denver, CO |
| Education | B.S. in Architecture, CSU |
| Favorite Tool | Router with tongue and groove bits |
| Writing Since | 2014 |
| Specialty | Hands-on home project guides |
| Website | www.homecraftedexpert.com |
| @woodworkwithkevin |
Conclusion
Without a doubt, tongue_and_groove is one of the most versatile and visually appealing joint systems in construction and woodworking. Whether you’re installing a new ceiling, upgrading your floor, or adding character to your walls, this method delivers quality, stability, and charm.
By using tools like tongue_and_groove router bits and choosing the right materials—like pine tongue_and_groove ceiling boards—you can create beautiful results that last for decades. Plus, with proper installation and care, you’ll avoid common issues while enjoying all the benefits this technique has to offer.
Ultimately, whether you’re a beginner or a seasoned woodworker, tongue_and_groove offers a simple yet impactful way to enhance any space. And with a little patience, the results will speak for themselves.
FAQs
1.What is tongue and groove used for?
Tongue_and_groove is used for connecting wood boards tightly. It’s popular in ceilings, floors, walls, and siding.
2.Is tongue and groove better than shiplap?
Tongue_and_groove offers a tighter seal and smoother finish. Shiplap has a gap for a more rustic look.
3.Can tongue and groove be used outside?
Yes, especially when using weather-resistant woods like cedar. It’s ideal for siding and exterior ceilings.
4.What tools do I need for tongue and groove installation?
You’ll need a nail gun, level, spacers, and possibly tongue and groove router bits or pliers for adjustments.
5.Should I paint or stain tongue and groove boards before installing?
Yes, it’s easier to paint or stain beforehand to ensure full coverage and prevent visible gaps.